Vision sensors are becoming increasingly popular and are widely used in a variety of industries such as automotive, electronics, food and beverage, pharmaceuticals, and packaging. The market for vision sensors is expected to grow significantly over the next few years, driven by the increasing demand for automation and the need for quality control.

Vision sensors can quickly and accurately detect defects or anomalies in products, enabling manufacturers to identify and fix issues before they become bigger problems. They can also be used for quality control and assurance, ensuring that products meet certain standards and specifications.
OMRON, a leading manufacturer of automation equipment, has developed a range of vision sensors that are designed to improve productivity and reduce costs. Their vision sensors use advanced image processing algorithms to detect, measure, and analyze visual information, enabling them to perform a wide range of tasks.
What Is a Vision Sensor?
By applying image processing to images captured by a camera, the vision sensor calculates the characteristics of an object, such as its area, center of gravity, length, or position, and outputs the data or judgment results. (For details, refer to the Fundamentals of Image Processing: Lenses (Cat. No. Q234).)

Fundamentals of Image Processing
1. Image Signals from the Camera
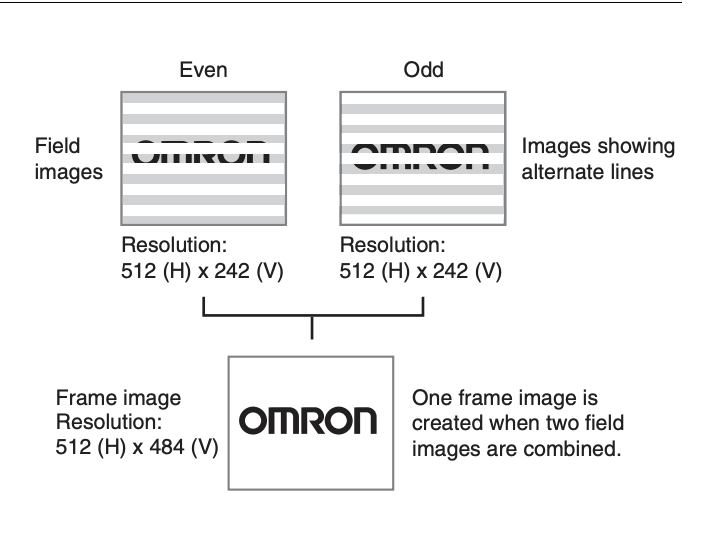
Frame/Field
For interline transfer cameras, the image signal is divided up and output for odd-number and even-number fields to transfer a single image. One frame image is created by combining these two field images.
Number of Lines to be read (Partial Scan Function)
By narrowing the image range to be loaded, the image scan time can be shortened. You can use partial scanning when a camera that supports partial scanning is connected.Set the range taking the offset of the measurement object into consideration.
2. Filtering
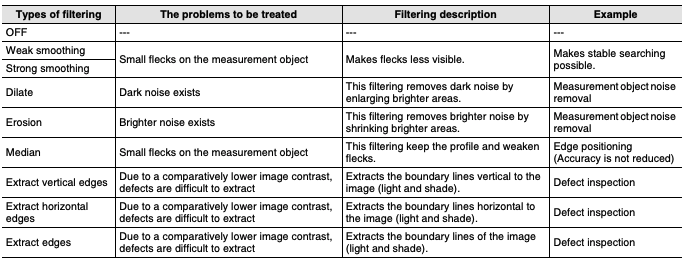
Filtering
Process the images acquired from cameras in order to make them easier to measure. You can acquire the optimal image for measurement by repeatedly filtering or by combining different types of filtering items.
Background Suppression
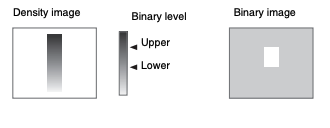
Background suppression (BGS) excludes the background of the measurement object from the measurement process for easier measurement.Set the upper and lower limits of the BGS density while monitoring the image.BGS changes image areas with densities below the lower limit to lower limit, and image areas with densities above the upper limit to upper limit.
Example: Lower limit set to 100 and upper limit set to 220

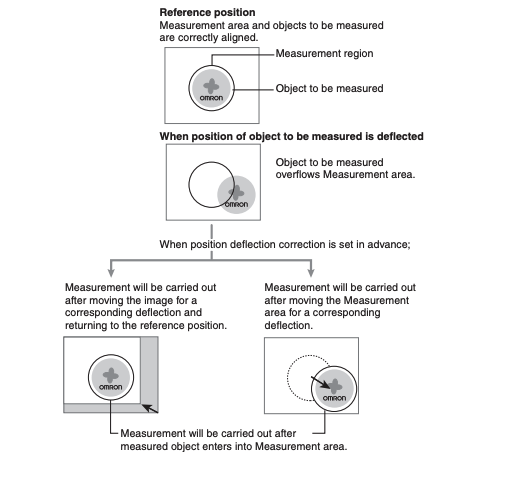
3. Position Compensation
When the location and direction of measured objects are not fixed, the positional deviation between reference position and current position is calculated and measurement is performed after correcting. Several different position compensation methods are available for you to choose from for specific applications.
4. Real Color Sensing
This is an OMRON-developed image processing technology that can process color images without color conversion. Conventional color vision sensors convert the color into a filtered grey scale image for processing. Real Color Sensing processes 16.77 million real color information (256 tones for each of RGB). This enables more precise inspection, which is closer to the human eye.

5. Gray Processing
This method processes images as 256 levels of black-and-white brightness. More precise, stable results can be produced compared to color segmentation.
Color image processing: Color images are converted into 256 levels of black-and-white brightness.

6. Segmentation Processing
Color images taken by the camera are processed after being converted into black and white pixels. Based on minimum information, high speed processing is possible.
Color segmentation processing: The color that is within the specified range of hue, saturation, and brightness is extracted. The extracted color is represented as white, and the other colors as black.

Monochrome segmentation processing: The brightness that is within the specified range is represented as white, and the others as black.

Measurement Processing
Vision sensors provide many different types of measurement processing items (algorithms) to measure the features of an object. The following are some examples of these algorithms:
1. Measurement Using Real Color Sensing
Measurements are performed by processing 16.77 million real color information (256 tones for each of RGB) taken by the camera, without any conversion. This results in more stable measurements compared with traditional methods. Because the object to inspect matches the processed image, the number of adjustments (e.g., lighting) required to prepare the image for processing can be greatly reduced.
Features
- Subtle variations in color can be recognized even in images with the same color of different materials or low contrast.
- Minute scratches on metal surfaces can be detected.
- Stable detection is possible even under fluctuating lighting conditions.
- There is no need to change settings to suit multiple product formats.
Edge Detection
Large changes in color and brightness increase the color difference. This change in the color difference is recognized as an edge. This can be used to count the number of edges of a specified color within the measurement region. This is ideal for detecting edges on labels of a similar color.
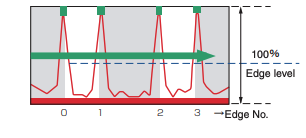
The maximum value of the color difference in the measurement region is taken as 100% and set as the edge level. A color difference greater than the edge level is detected as an edge.In the figure to the left, you can see that four edges have been detected.
Defect Inspection
The function divides the measurement region into smaller defect detection areas (elements), and measures the color differences (defect levels) between each element and its surrounding elements. This method is not affected by the background, so it enables the detection of defects on marks, low-contrast defects, and defects on metal surfaces.

2. Measurement Using Gray Processing
Images taken by the camera is processed as 256 levels of black-and-white brightness. These processed images are used for measurements.
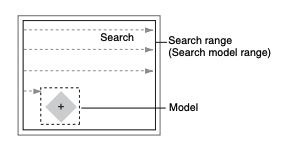
Search
Reference image patterns are registered as models and then search is performed using the parts of input images that most resemble the models. The degree of similarity is represented with a correlation value, and inspection for defects and different parts being mixed in can be performed. The position (X, Y) where the model was found can also then be output for use in positioning.
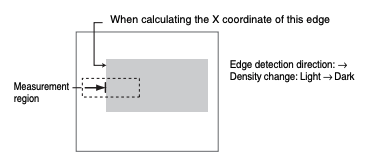
Edge Detection
Edges are found through changes in density. Set the Edge detection direction and Density change as the edge detection conditions.
Surface Defects
This method checks for surface defects by measuring variations in density.However, the background must be completely uniform as a prerequisite condition. This method uses variations in density, so if there is a pattern or marks within the measurement region it will be detected as a defect.

3. Measurement Using Segmentation Processing
Images taken by the camera are processed and measured after being converted into black and white pixels.
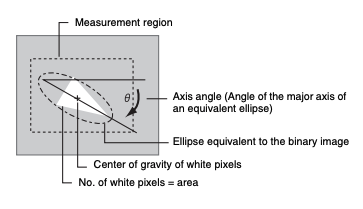
Center of gravity, Area, and Axis Angle
The center of gravity, area, and axis angle of the white pixels in the measurement region can be measured.
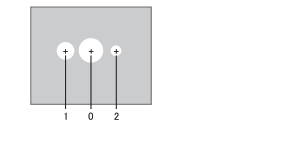
Labeling
Labeling is the process where a different number is given to each extracted label. Use a labeling measurement to count how many labels there are in a measurement region and to find the area and center of gravity of a specified label.
Example: Sort by area in descending order
4. Measurement Using EC (Edge Code) Image Processing
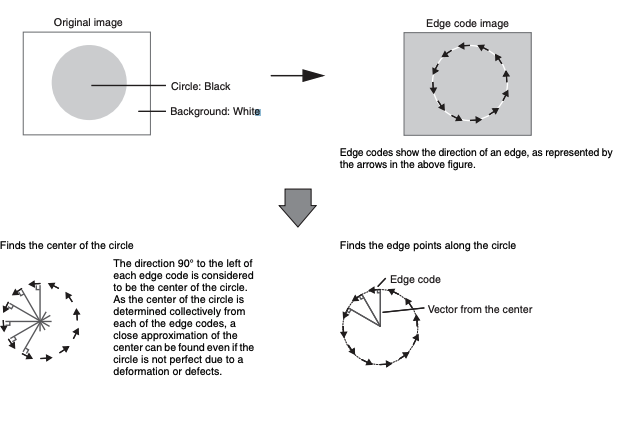
Changes in brightness are extracted as an edge, and the direction of the changes in brightness is calculated. This direction is called the edge code (EC). Measurements using EC can detect shapes such as circles or rectangles through geometric calculations based on the edge codes, so this method is less affected by deformation or dirt. Some examples of processing that use edge codes are EC defect inspection and EC positioning.

Example of Circle Extraction Using Edge Codes
EC Defect Inspection
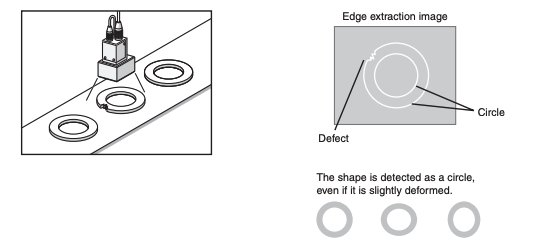
This method can detect minute defects or low-contrast defects on circular or linear measurement objects with high precision. Stable detection can be performed on easily distorted or deformed objects such as rubber packing.
Example: O-ring defect and burr inspection
EC Positioning
Positioning marks are detected using shape information such as “round” or “angular.” High-precision positioning is possible even if the shape is deformed or a portion of the shape is missing. It also works with low-contrast images.

ECM Search (Edge Code Model Search)
This processing item searches the input image for parts having a high degree of similarity to the target mark (model), and measures its correlation value (similarity) and position. This processing assures a reliable search even for low-contrast or noisy images.

(Content of this blog is originally from OMRON)
Why We Are One
For over 40 years, IBS Electronics Group has provided a broad range of integrated supply chain and electronicsmanufacturing solutions tailored specific to our customer's operations. As your one source for the industry’s top brands all in one place, our engineers specialize in reducing supply chain complexity and are here to provide you with dedicated support from prototype to production.


.png)
.png?resizemode=force&maxsidesize=96)

